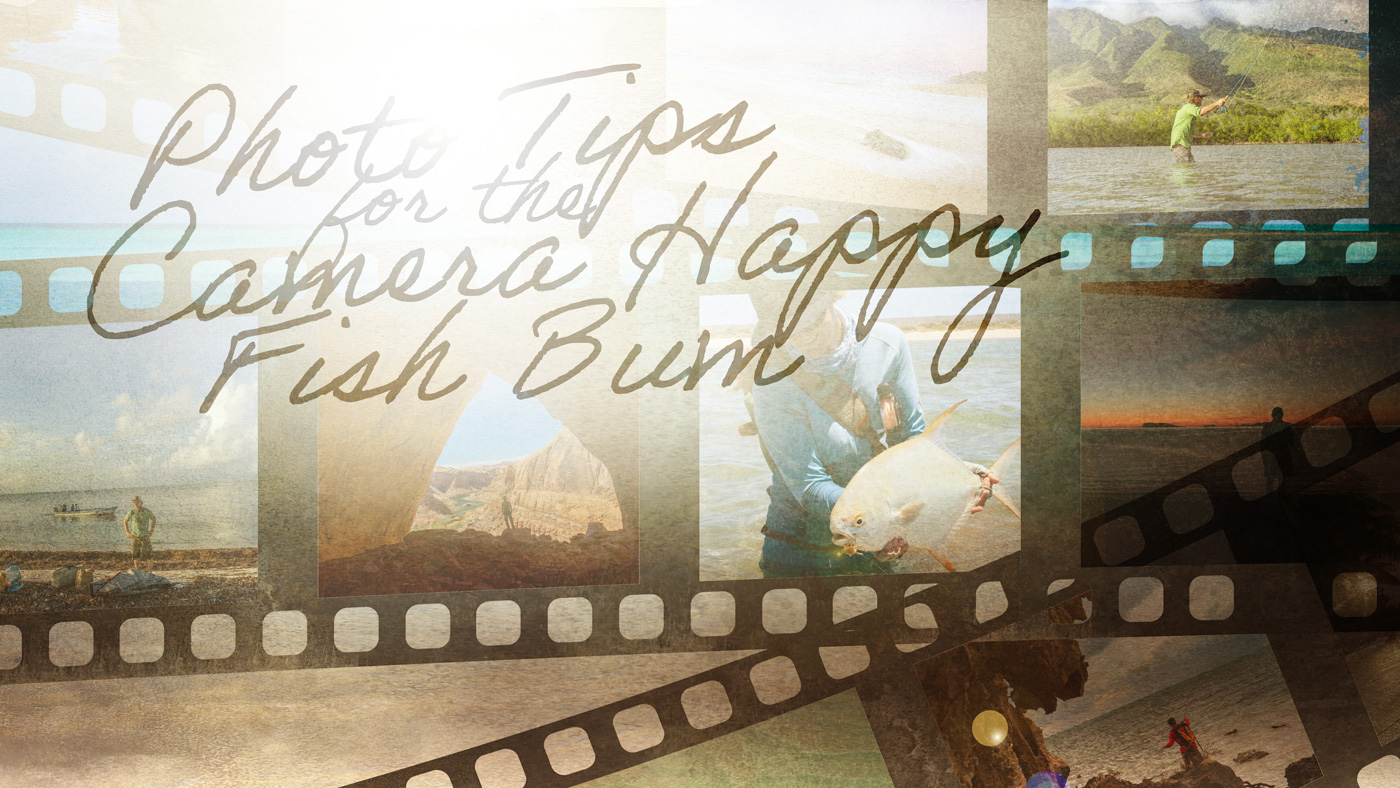
Photo Tips for the Camera Happy Fish Bum
DIY fishing adventure travel photography tips techniques for the camera happy fish bum living life day by day, cast by cast and photo by photo.
You know who you are! The casual, wayword photographer. There are a whole lot more of you than there used to be, especially with the way photography, technology and cell phones are rocketing as a trio into the future, a relationship not soon to end. Because of this relationship, taking snapshots of anything and everything is not only possible, it’s happening! With that being said, the goal for this article is to help our readers approach photography with open minds, discipline, ingenuity and ultimately, inspiration.
I’m gonna stick to the actual photo taking part of photography in this article. Not gonna pretend like we don’t do some post editing in Lightroom or Photoshop… or even Instagram! Cuz, we do! However, the goal is to do as little as possible. Keep in mind, the more post editing you do to a photo, the more degraded it will. A degraded photo fine for social media, but when it comes to printing it, forget about it! Don’t get in the habit of putting a post edit bandaid on an image you worked hard to capture.
When it comes to equipment, I personally don’t have expensive cameras or lenses. I travel too much to merit that kind of gear. I travel light and inexpensively. And, as the world get’s smaller and traveling has become a way of life, I know I’m not alone. In this article, I’m not going to talk about specific cameras, lenses or filters. I am, however, going to generalize the information for everyone and let you, as the photographer, interpret the info as it relates to your own personal equipment. For you cell phone photographers out there, the following may not fully pertain to you. But, I’m sure you’ll dig the read anyway and get some useful tidbits out of it. Also, please understand that this article will only touch on a handful of techniques. There are a myriad of techniques and approaches out there such as daytime long exposures with ND filters, nighttime star trail captures and over-under photography, to name a few. What’s covered here are some simple approaches that have consistently delivered for us out on our expeditions in remote locations over the years, from sunrise to sunset.. to nighttime.
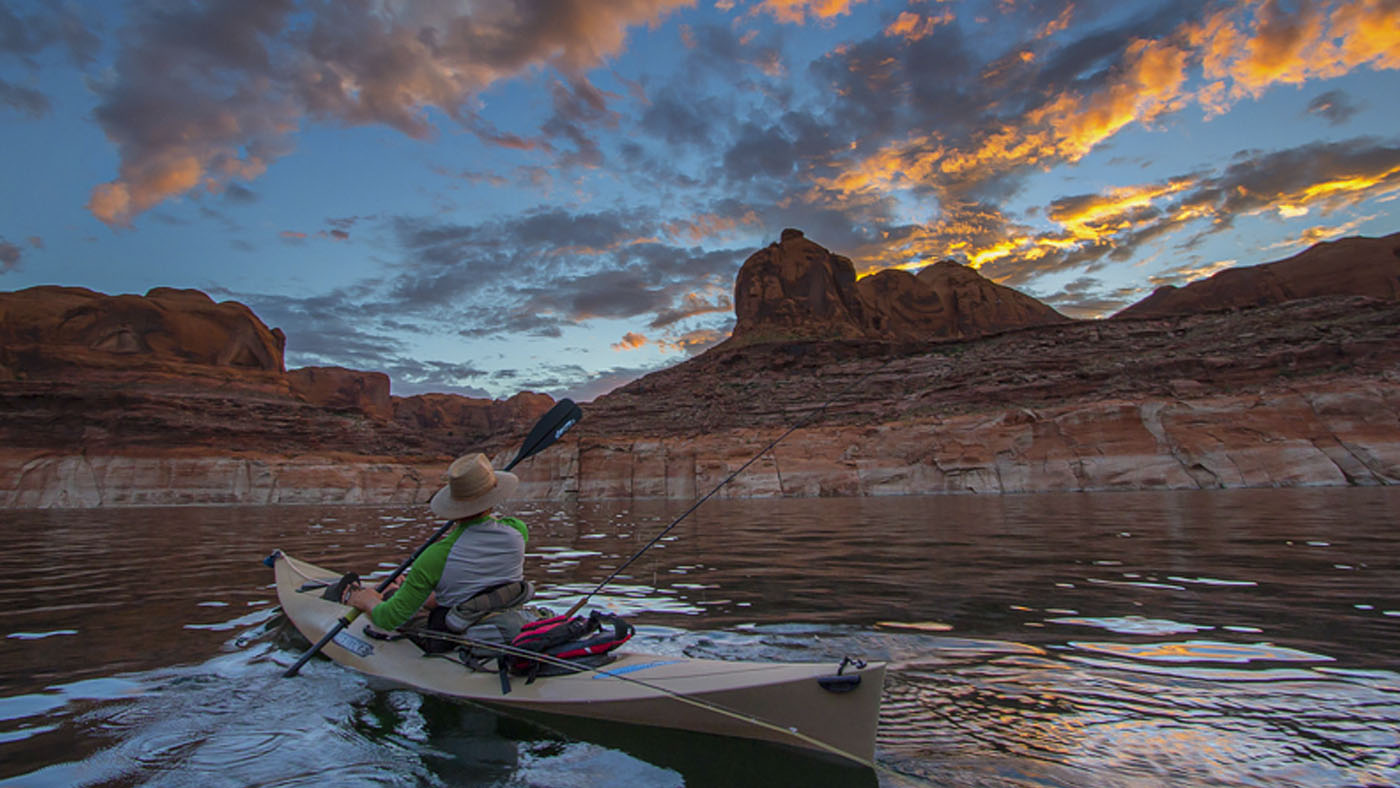
photo: Ryan Bonneau
Waiting for the Sun in Utah
Early bird… gets the best friggin’ shot! Not only are early morning conditions usually calm, the lighting can be pretty epic. From first-light to sun-up, take advantage of that new day light and the contrasting color it can provide. All you have to do is wake your ass up and crawl out of that warm cocoon of a sleeping bag (I know… just when you’ve finally gotten comfortable). Keep in mind, those fish that you’re trying to catch get up early too!
If you’re out on the flats or another wide open spot, an early morning usually means tranquility. Calm water often provides anglers rare opportunities to hone in on the slightest of movements from fish as they move water. Whether it’s a tailing bonefish you’re chasing or a wake from a baby tarpon, you should be able to maximize your time with the fish you’re targeting before that wind picks up and the light flattens out. A calm morning can often bring highly reflective surface conditions—beauty times two. With reflected light added to your composition, detail that would otherwise be hidden in the shadows might be captured in the shot. Unfortunately, glassy water can also make visibility below the surface nearly impossible. Gotta wait for a higher sun for that. Good news is spooky fish are less likely to see you with this light.
If you’re in the mountains, you might need to wait until a little past dawn for the good light to creep its way into the valley. This all depends on the steepness and height of the topography surrounding you. Mountains tend hide that early morning sun. When the day warms up and the light’s just right, it can be spectacular… especially with those gorgeous, backlit peaks opposite the sun. If you’re below tree line, keep an eye out for the golden sun beams peering through the canopy.
General pre-sunrise camera settings:
- White balance set to “Cloudy”
- ISO 400+ (too much higher will add graininess)
- Fast shutter speed (unless you want a long exposure shot) – 1/400+ second
- Aperture f/2.8
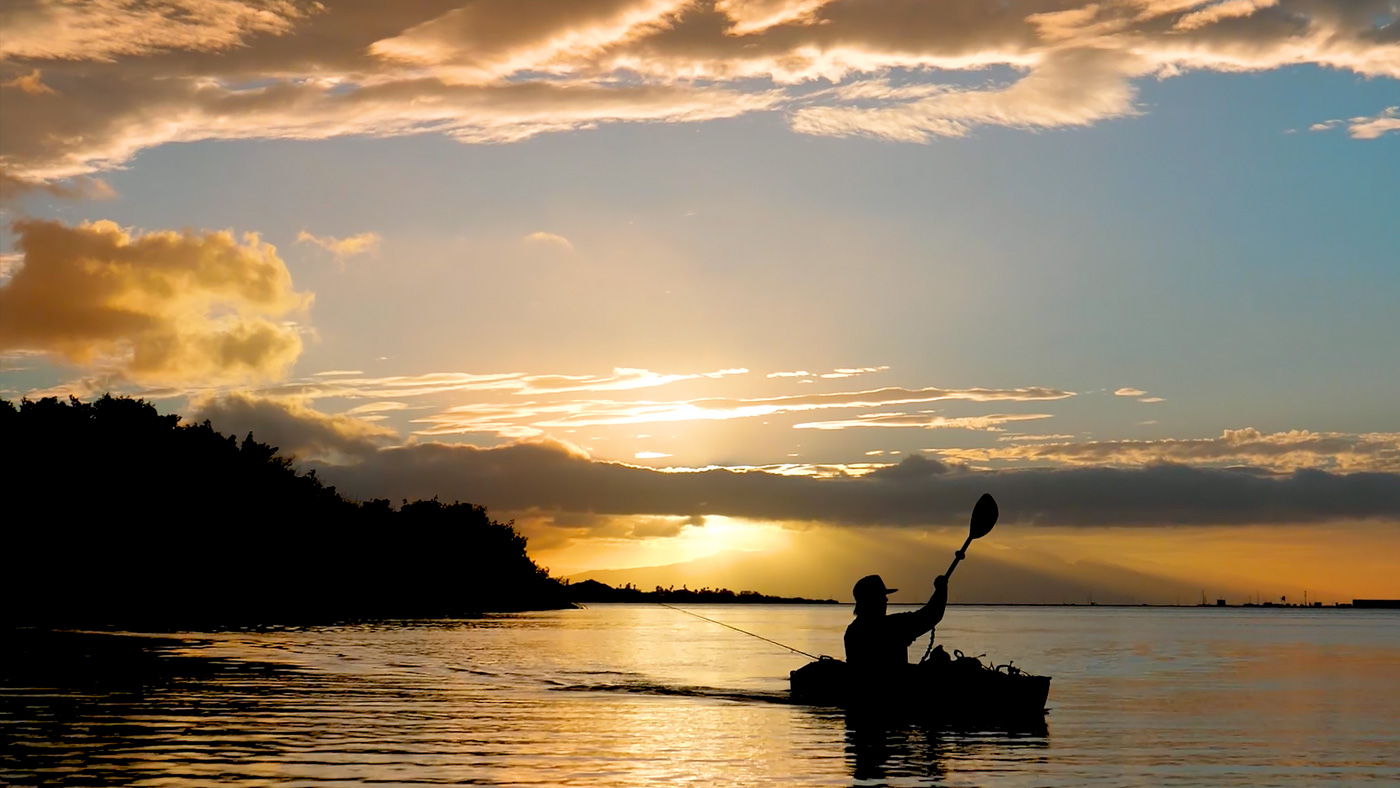
photo: Ryan Bonneau
Lighting the Way in Hawaii
There’s a difference between pre and post sunrise photography. Here are some of the general camera setting guidelines to take after that fiery orb rises above the horizon:
- Change your white balance to “Sunny”
- Bring your ISO down to 100 to capture the rich color
- Play with the shutter speed depending on the subject but not slower than 1/15 sec
- Aperture settings can vary greatly at this point – we tend to use f/2.8 for more detail in the shot
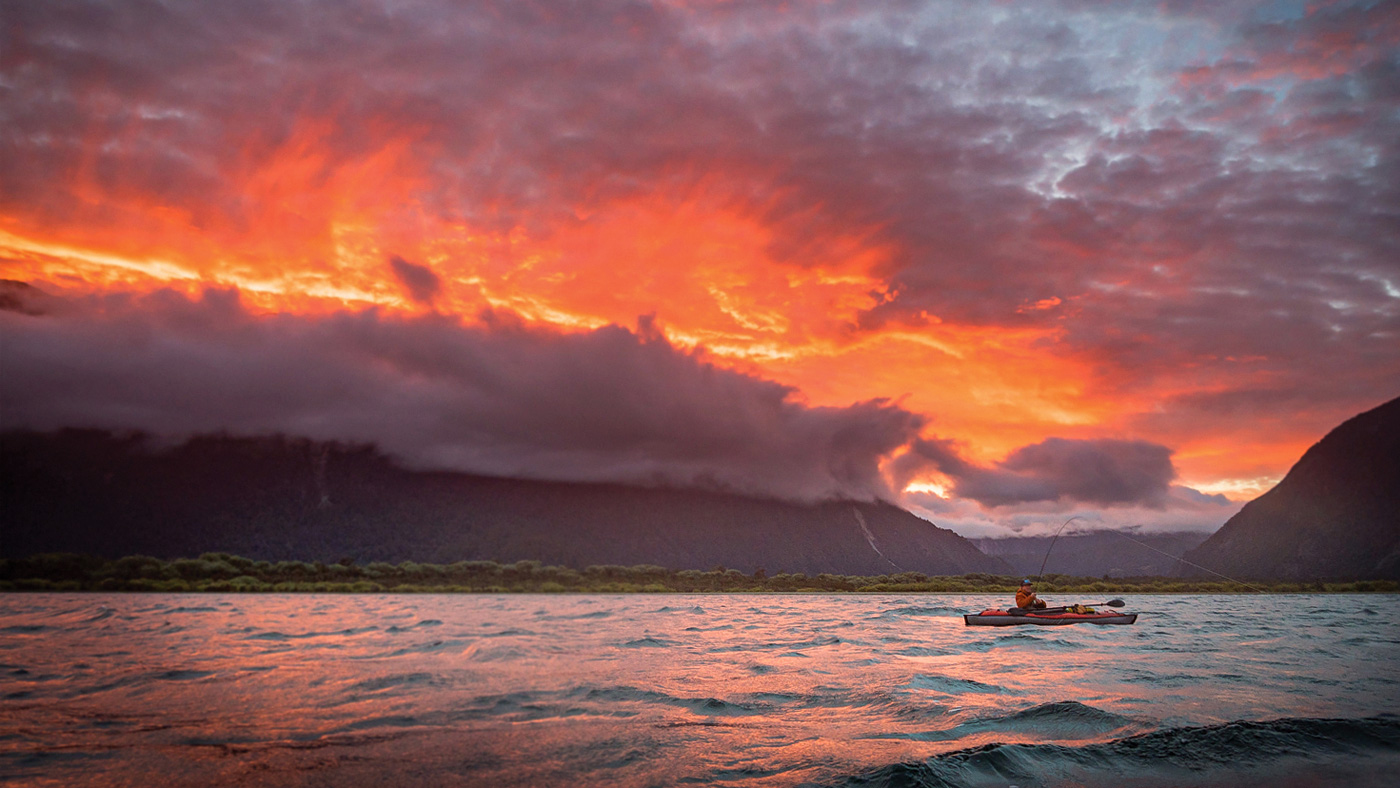
photo: Ryan Bonneau
Evening Fire in a Patagonian Sky
On the other side of the coin, the evening light can be equally as impressive as its early morning counterpart. The best thing is you don’t have to get your ass out of bed for it, unless you’re a vampire. Even if you have just the slightest interest in the outdoors, you’re pre-conditioned to be curious about what the sunset might bring. And, one can never really predict it. The only thing you can predict is that it will happen. Just be ready. And it’s never a bad idea to have the shot you want in mind set up ahead of time because that color hits when you least expect it. And be ready to adjust your camera settings. Depending on the focal point, think about how the light lays down on the subject. Shadows hiding detail can be a challenge. But shadows in conjunction with lit elements (ie. human faces, fabrics, mountains, etc) can be powerful.
Red sky at night… photographer’s delight. For the action shot above, it’s all about being in the right place at the right time. It was shot from a moving kayak in choppy conditions. Hence, a fast shutter speed was used. Also, a maximum depth of field was used in order to truly capture the whole scene. Also, Ryan used a longer focal length to allow the red hues to “glow” thoughout the frame.
Try these settings:
- manual focus (on kayaker, unless there’s no foreground or subject)
- fast shutter speed
- wide aperture (f/11 or higher)
- low ISO for the contrasting details and dramatic light (too high will make it grainy)
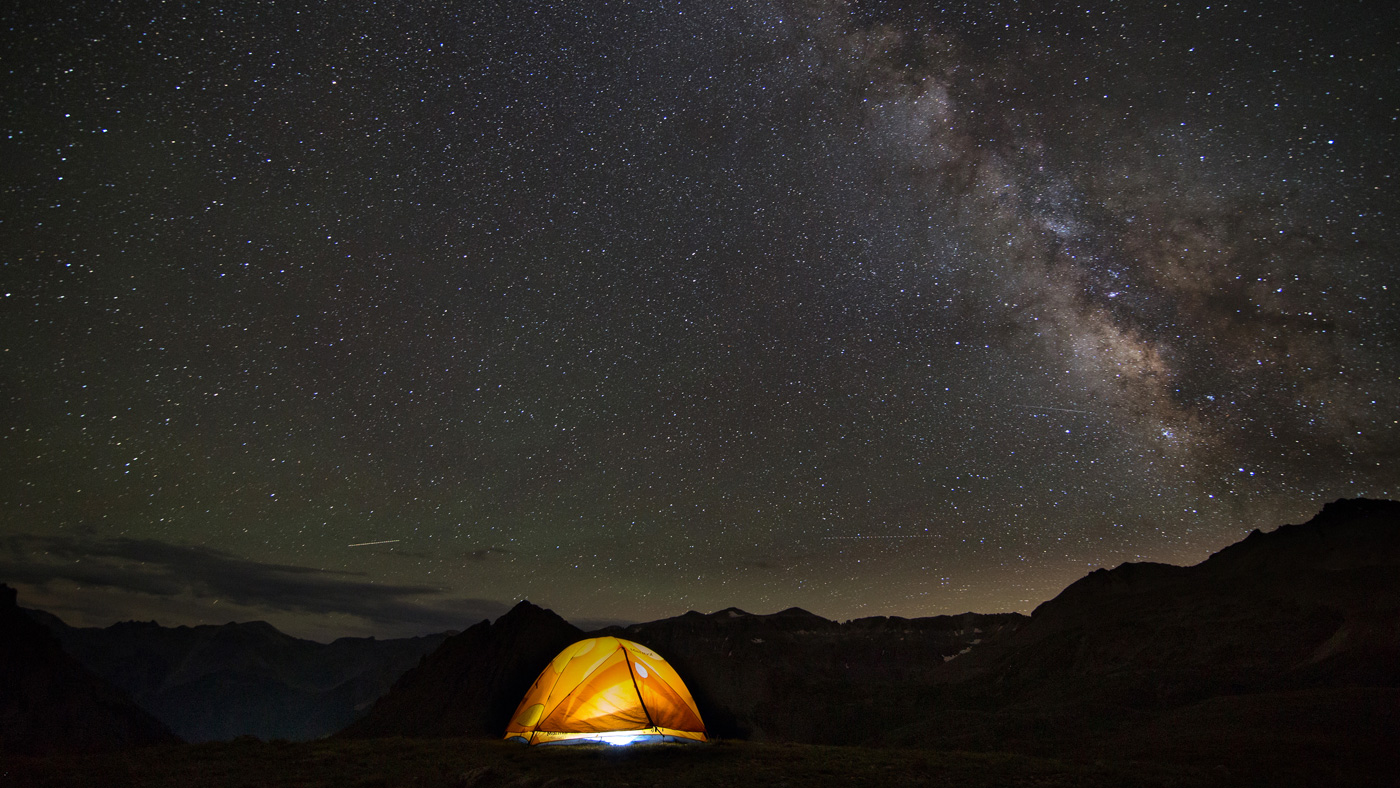
photo: Ryan Bonneau
One in a Trillion in Colorado
Scenes like this do two things: they calm the soul, and they make you feel very, very small. Both good things. To evoke those kinds of feelings from the capture of a night sky is quite a challenge. Choice of location is huge! Try to find a spot with the least amount of light pollution from any nearby towns. In terms of composition, it’s always great idea to research weather, moon phase and where the Milky Way will be on the night you want to shoot. Generally speaking you want clear skies. The movement of clouds will cause blurred sections of the composition due to the long exposure. But, you might want that effect. Up to you. A “new moon” phase is perfect for capturing the cosmos with milky way. If you factor in where the Milky Way crosses the sky and hits the horizon as it relates to your focal subject, your composition might reach another level of impact for the viewer. Just a head’s up, late summer provides the most contrasting and vibrant Milky Way color.
For a shot like the one above, bring a couple light sources (one for the tent and one for your own safety), a prop like a tent, a comfy chair, warm clothes, hot toddy and… a tripod! You’ll have to check the photo after to see how sharp the stars were. If you need to, adjust the focus just a touch for the next shot.
Play with these general camera settings:
- manual focus on “infinity” (you’ll have to play with this a little from composition to composition)
- low aperture (f/2.8 or lower if possible)
- long exposure (15+ seconds but not more than 30 as stars will get too blurry)
- high ISO (1000+)
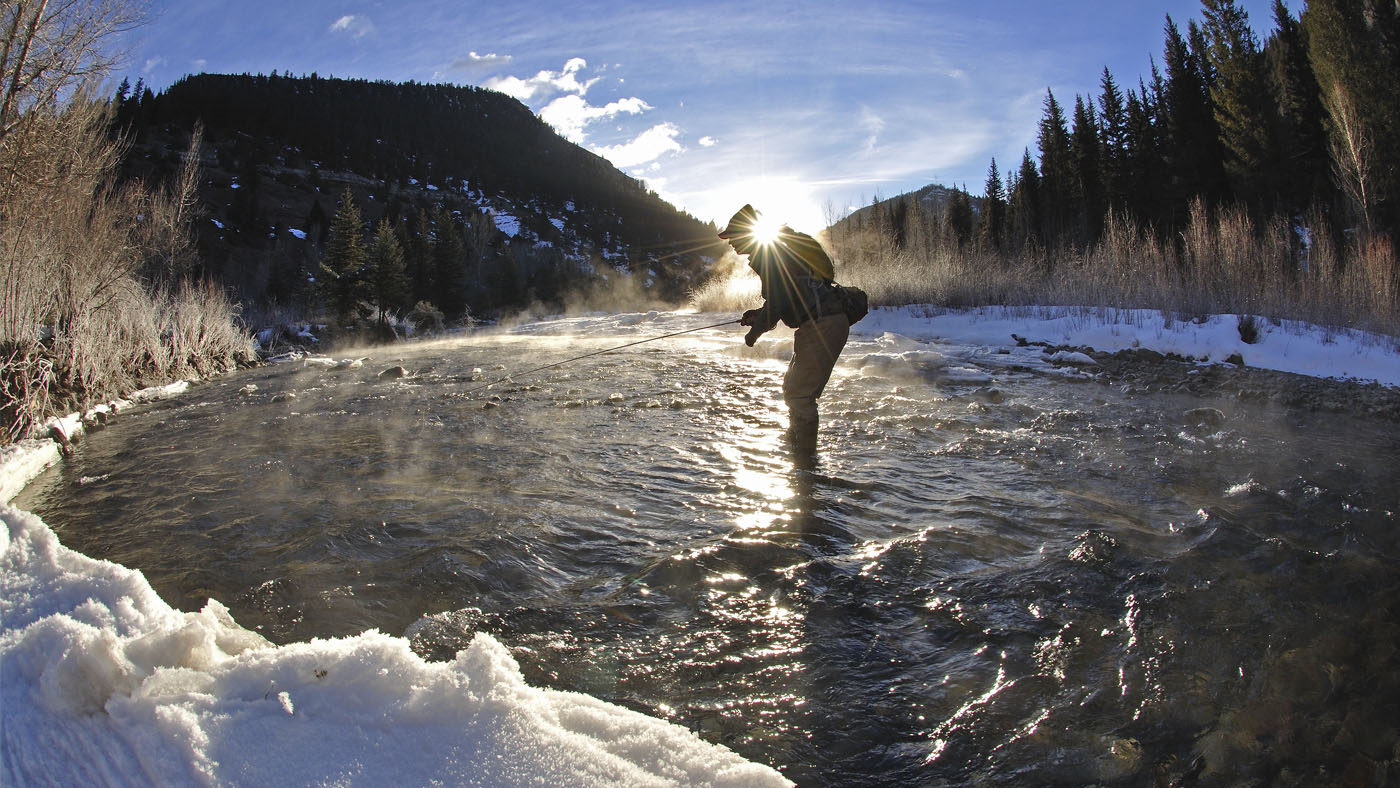
photo: Ryan Bonneau
Winter Focus in Colorado
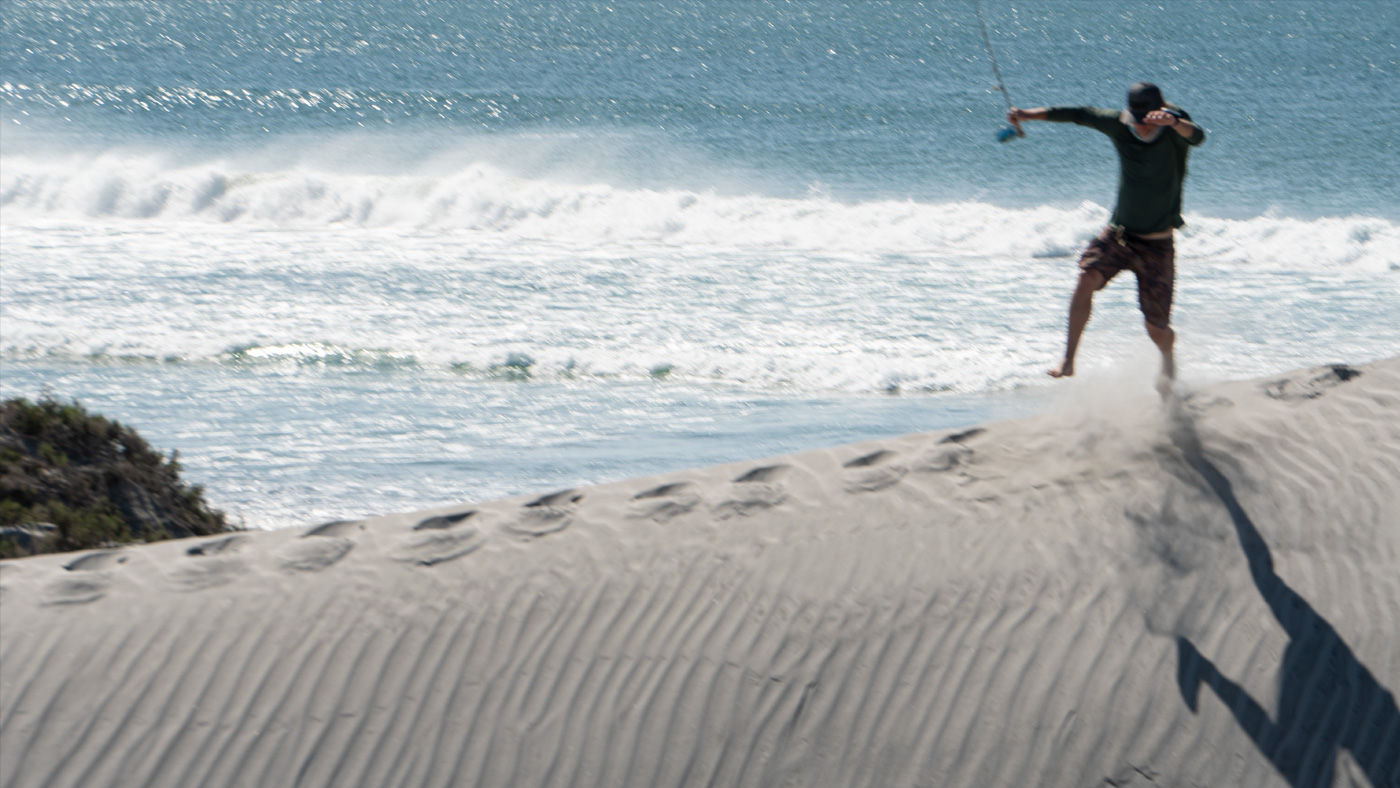
Sure, “hero” shots are fun. Problem is, they’re plastered all over the internet and social media. Do we really need more? A more creative approach would be to focus on the events that lead up to those moments of triumph? To capture the hard work and determination it takes to land a fish—now, there’s a challenge. Get creative with perspective. That’s often what distinguishes a professional photo from an amateur one. Try shooting from a lower vantage point. Try from above. How would a fish see the shot? How about a hawk? Bottom line, the scene should dictate which angle you should take. Find that angle, then prefocus your camera. Set your camera to continuous mode and be ready to shoot in short bursts. You better be ready when that trout takes the fly or that tarpon launches from the water! You may not get another chance at it. And don’t forget to use a fast shutter speed. Start with 1/1000 and go from there. Good luck. Yes, luck is absolutely a key component. (I’ve been trying for years to capture that split second moment just before an osprey enters the water for a fish. I’ll let you know when I get it.)
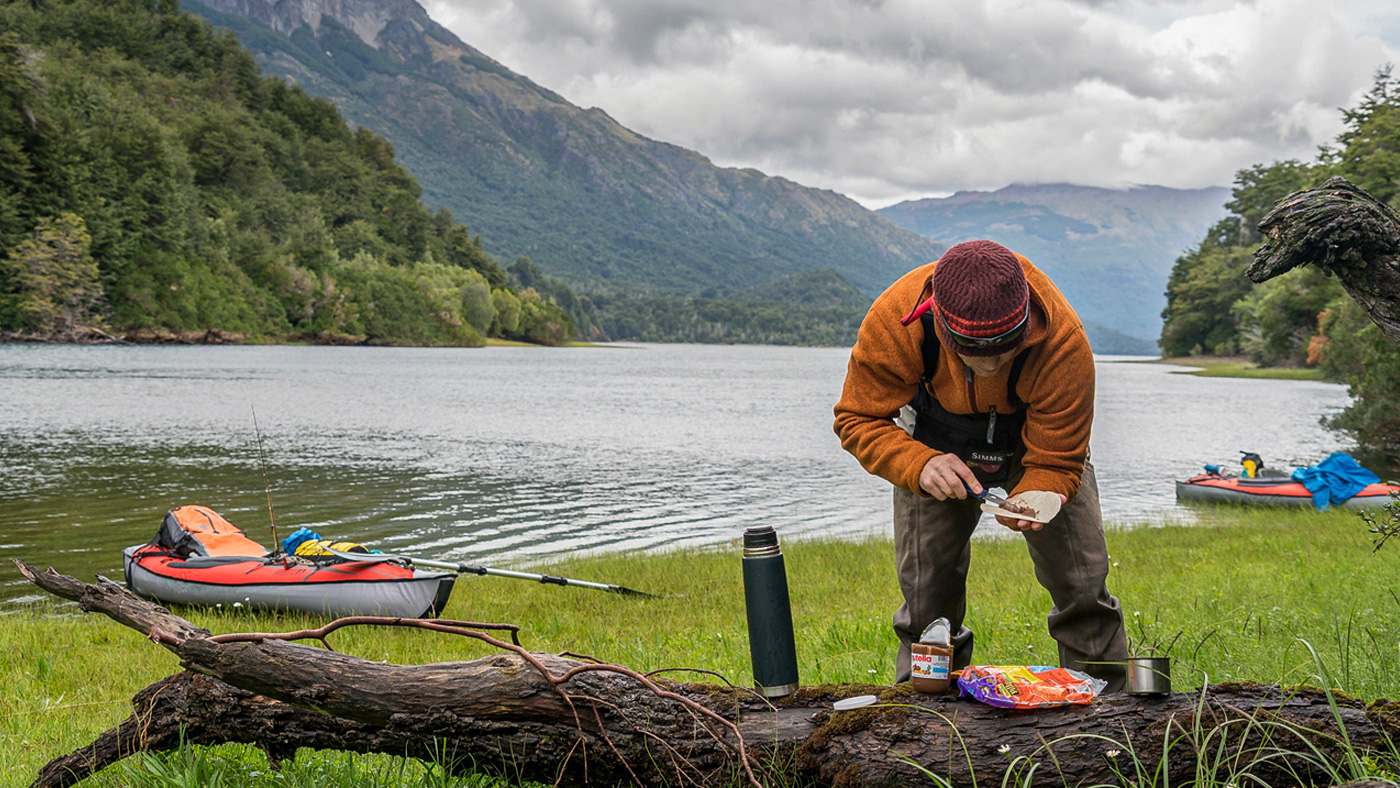
photo: Ryan Bonneau
Story Telling in Patagonia
There’s a story to be told everywhere you look. During an epic adventure, we can easily get caught up in the heat of the moment and forget about the big picture. “There’s a story to be told. There’s a story to be told.” Let this be your mantra. Here’s a question for you: Is it ever a good idea to rush into a cathedral all hopped up on cigarettes and caffeine? Who hasn’t been there, am I right? Instead, relax… take a deep breath… step back… and survey the scene. Consider all the elements on the periphery. Now look at the focal point. Take it all in because all the elements are interconnected. Think about how a great writer sets the scene in a book. Your camera represents the words on those pages. Simply find the balance… feel the rhythm… tell the story. Click.
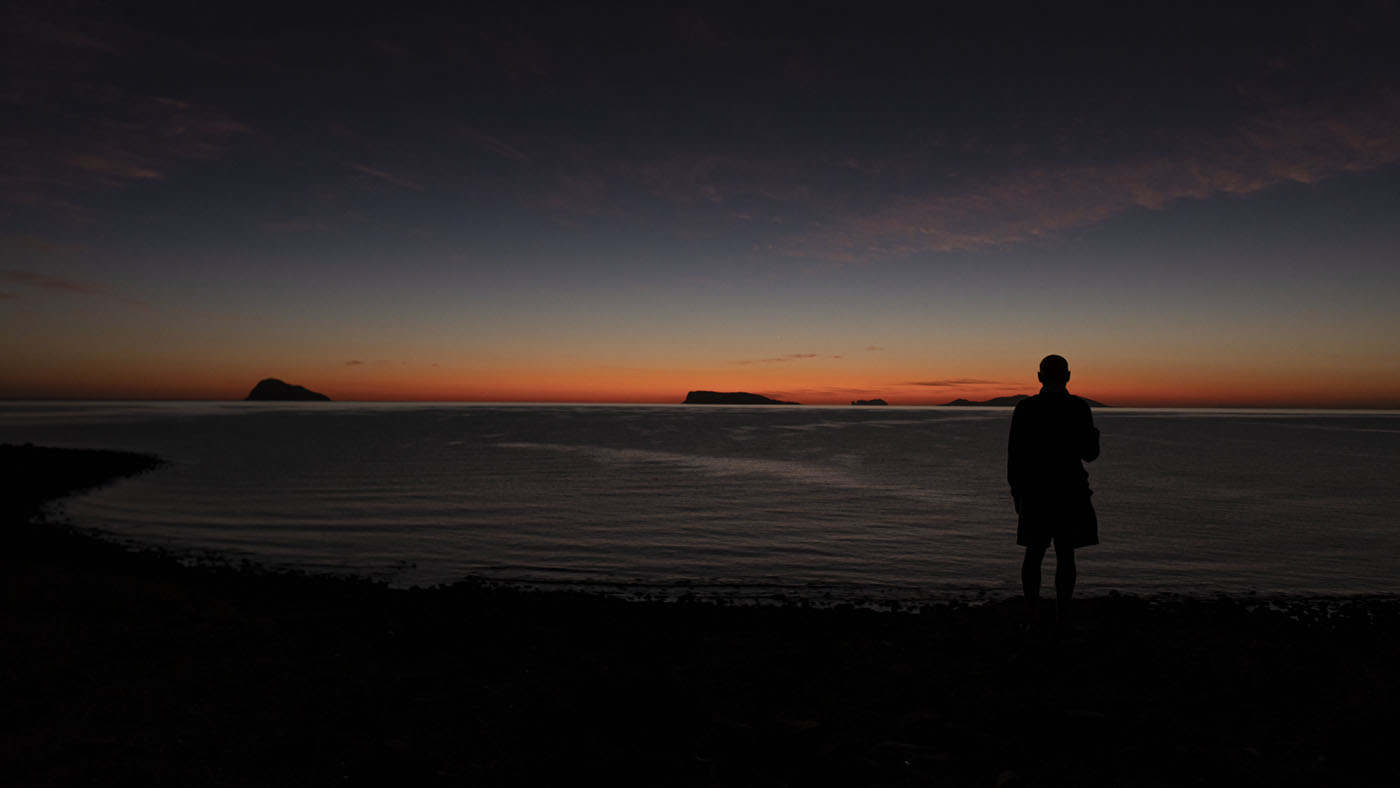
photo: Brock Munson
A Flair for the Dramatic in Baja
In the world of photography, nothing says “drama” quite like a silhouette. Scene: it’s dusk and you’re thinking that it’s time to start heating up the beans, chopping up the onions and diving into the tortilla chips. Here’s some advice: the beans can wait! Think about it. You brought a headlamp for a reason, right? You can heat those beans later. Now is the time to take advantage of that oh-so-sweet light. First light and last light are fleeting moments during the day. They offer the inspired photographer wonderful opportunities, however short they may be, to capture some potentially dramatic light. Get out there and shoot! It’s always nice to plan ahead for these moments, ie. scouting where to shoot and how the light might fall. But, keep in mind that it’s hard to predict what you’re going to get. That’s really the excitement of it—the unknown. This dramatic light can make for some breathtaking color combinations and stunning silhouettes.
A silhouette-based photograph uses the power of contrast and symmetry between positive vs negative. It’s this “dance” between the two that can be absolutely mesmerizing and powerful. The stark contrast and sharp edges can evoke real intrigue from the viewer.
When preparing for the shot, try focusing your attention (and your camera) on the lit background instead of the silhouetted subject in the foreground. Your goal should be to maximize the background’s brilliance and color. Remember, it’s the background that frames the silhouette. Without it, there’s nothing. When the background is at its full potential, only then does the silhouetted foreground gain prominence.
For the shot above, have your subject stay as still as possible. Use a tripod. Put timer on for 2 sec (or use a remote). Make sure there’s enough light so that there’s a hint of detail on the landscape or water… but not too much. Be mindful of the level of the horizon line in your composition. It’s such a major factor. If that line it’s off kilter, it’ll stick out like a sore thumb (but maybe imperfection is what you’re shooting for). What gives this image its power and uniqueness is the subtlety of the silhouette and the hint of light that embraces the earliest moments of the day.
Play with these general camera settings:
- top your ISO out at 200
- set your f-stop up to f/9.0
- Speed up your shutter to 1/250 (faster for tighter action shots)
- God speed
The Takeaway
Whether relaxing on the coast with a beer in hand or battling a monster at the end of your leader, don’t take those moments out on the saltwater flats or the desert river banks for granted. Pre-think your composition opportunities in whatever environment you find yourself in. And, for Pete’s sake, be ready with your camera when the primo moment presents itself. You just might capture something truly memorable for the world (or just you) to see.
Share your latest photo on Instagram and use hashtag: #chasingscale. We’d love to catch a glimpse of your adventures. If you’d like to further promote your skills, submit your photo(s) to chasingscale.com. We’d love to share your work right here on our website for the world to see!
Essay by Brock Munson
cofounder, Chasing Scale
Brock is the lead writer at Chasing Scale • brockmunson.com